
Haldex 4 generacji. Serwis
Wymiana oleju. Kiedy należy wymienić olej w układzie Haldex?
⚠️ Olej w systemie Haldex należy wymieniać co 30 000 km, a filtr co 60 000 km. Jeśli nie jesteś pewien, kiedy i czy olej w systemie Haldex był kiedykolwiek wymieniany, warto również zdjąć i wyczyścić pompę olejową, a następnie zamontować je z powrotem, używając nowych uszczelek (oringów).
Tutaj znajdziecie Państwo wszystkie niezbędne części do wykonania tej czynności – Oficialny sklep Borg Warner
Narzędzia potrzebne do wykonania serwisu
- Klucze nasadowe Imbus/HEX: 8 mm, 5 mm oraz 4 mm
- Klucz dynamometryczny: 5-35 nM
- Szczypce Długie oraz wkrętak płaski
- Narzędzie diagnostyczne (opcjonalnie)
Zestaw do wymiany oleju:
- Olej Haldex: (część nr G 060 175 A2, BorgWarner 2000884)
- Wkład filtra Haldex BorgWarner 2003085: (1 x Nowy filtr oleju, 1 x dekiel z kapą (kanał olejowy) i oringami, 2 x śruba mocująca)
- Pojemnik na zużyty olej
- Strzykawka lub ręczna pompa do uzupełniania nowego oleju
- Ściereczki lub ręczniki papierowe
Wymiana oleju
1. Przygotowanie pojazdu
- Unieś pojazd na podnośniku lub wjedź na rampę serwisową.
- Zabezpiecz pojazd klinami pod koła i upewnij się, że jest stabilny.
2. Opróżnienie starego oleju

- Zanim spuścisz stary olej, kluczem Imbus/HEX 5 mm poluzuj korek wlewu oleju (znajdujący się na górze obudowy Haldex), a następnie dokręć go z powrotem. Jeśli z jakiegoś powodu korek wlewu nie da się odkręcić lub ulegnie uszkodzeniu, a wcześniej otworzysz korek spustowy, napotkasz problem z ponownym napełnieniem systemu olejem.
- Kluczem Imbus/HEX 8 mm odkręć korek spustowy oleju.
- Opróżnij cały zużyty olej do przygotowanego pojemnika.
- Wyczyść otwór spustowy i korek przed ponownym montażem.
3. Wymiana filtra oleju
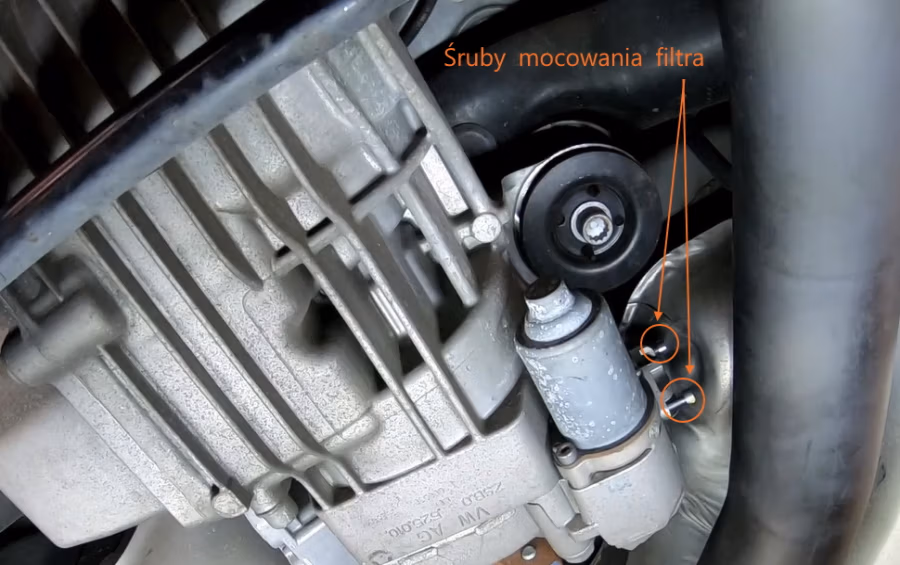

- Zlokalizuj obudowę filtra (zwykle mocowaną dwoma śrubami).
- Odkręć obudowę i ostrożnie usuń dekiel filtra oraz stary filtr. Możesz wkręcić w obudowę dekla śrubę, a następnie użyć szczypiec, aby go wyciągnąć. Alternatywnie, możesz użyć narzędzia diagnostycznego, aby aktywować pompę – wypchnie ona filtr. W takim przypadku nie odkręcaj pokrywy filtra całkowicie, pozostawiając ją luźno zamocowaną.
- Wyczyść wnętrze obudowy z pozostałości oleju i zabrudzeń.
- Zamontuj nowy filtr oraz dekiel z uszczelkami. Przed montażem nasmaruj uszczelki olejem, aby zapewnić ich lepsze uszczelnienie i ułatwić montaż.
- Przykręć obudowę filtra zgodnie z zalecanym momentem (zazwyczaj 5-6 nM).
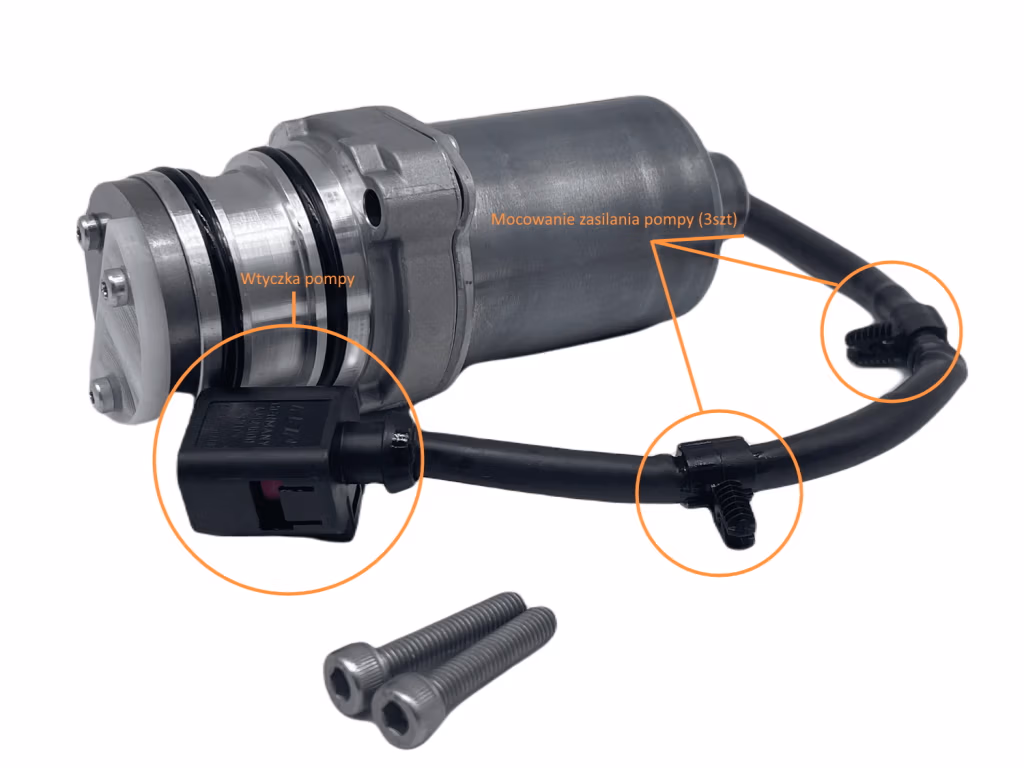
4. Demontaż oraz czyszczenie pompy oleju
- Odepnij wtyczkę pompy (2 pinowa wtyczka na sterowniku)
- Odepnij 3 punkty mocowania przewodów zasilania pompy
- Odkręć 2 śrubki mocowania pompy i zdemontuj pompę.
- Dokładnie wyczyść miejsce montażowe pompy.
- Odkręć 2 śrubki mocowania sitka pompy i dokładnie wyczyść sitko oraz pompę
- Zamontuj pompę używając nowych uszczelek/oringów


5. Napełnienie systemu nowym olejem
- Wkręć korek spustowy oleju z powrotem na miejsce i dokręć go z momentem 30 nM. Zaleca się użycie nowego korka.
- Upewnij się, że pojazd znajduje się na równym podłożu, aby zapewnić prawidłowy poziom oleju w systemie. Użyj strzykawki lub ręcznej pompy, aby wlać nowy olej Haldex przez otwór serwisowy, aż zacznie się wylewać.
- Po napełnieniu zakręć korek serwisowy.
- Upewnij się, że temperatura oleju znajduje się w zakresie 20-40°C, używając narzędzia diagnostycznego lub termometru. Jeśli to konieczne, wykonaj krótką przejażdżkę, aby rozgrzać olej, lub poczekaj, aż ostygnie, aby osiągnąć niezbędny zakres temperatury.
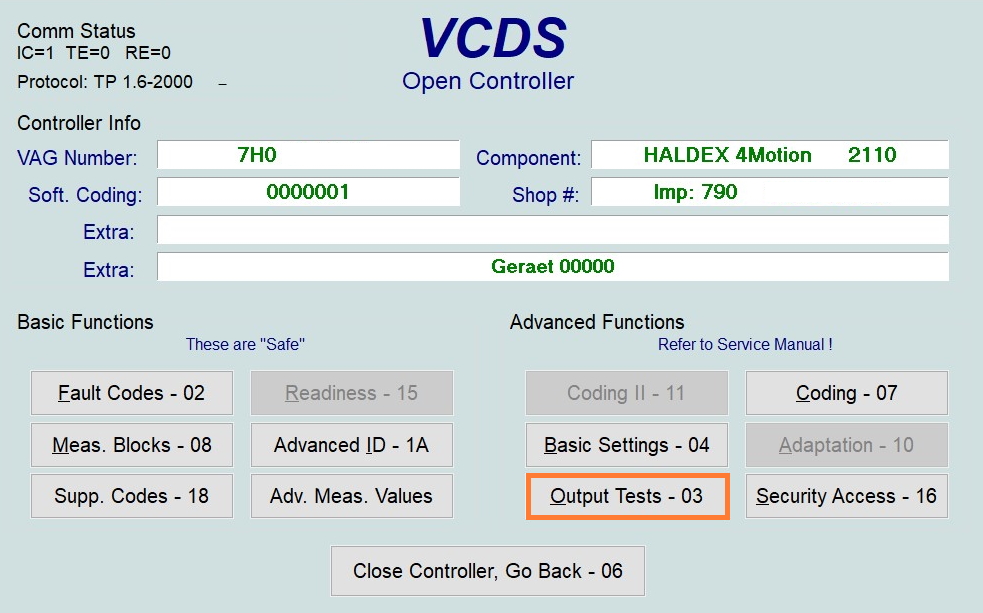
- Przy użyciu narzędzi diagnostycznych (np. VCDS) wykonaj test pompy oraz zaworu, aby zapełnić układ olejem.
- Dolej olej, aż osiągniesz prawidłowy poziom (po dolaniu olej powinien delikatnie wylewać przez otwór wlewu), upewniając się, że system jest odpowiednio napełniony, ale nie przepełniony. Pojemność układu całkowita wynosi 0.85l, pojemność przy wymianie 0,7 – 0.75l
6. Sprawdzenie szczelności
- Dokręć korek wlewu. Sprawdź, czy nie ma wycieków wokół korków i filtra.
7. Utylizacja zużytego oleju
- Oddaj zużyty olej do punktu zbiórki odpadów.
Gotowe!
System Haldex jest teraz gotowy do działania!
Całkiem nie zły DIY filmik. Pokazano tam w jaki sposób możemy użyć urządzenie diagnostyczne w celu demontażu filtra oleju. Do tego warto również zdemontować i wyczyścić sitko pompy oraz prawidłowo uzupełnić olej jak opisano powyżej.